Installing a bow mount trolling motor might feel intimidating at first, especially if you’re doing it for the first time. Many anglers worry about drilling holes in their boat or getting the alignment wrong. The good news is that with a little patience and the right approach, installing a bow mount trolling motor is much simpler than it looks. Once installed properly, it gives you better boat control, quieter movement, and far more accuracy when fishing structure or shallow water.
How to Install a Bow Mount Trolling Motor
Before starting the installation, it’s important to understand why bow mount motors are positioned at the front of the boat. A bow-mounted trolling motor pulls the boat instead of pushing it, which gives you smoother steering and better control in wind or current. That’s why bass anglers and serious freshwater fishermen prefer this setup.
What You Need Before Installation
Before mounting the trolling motor, take a few minutes to gather everything you need. You’ll need your bow mount trolling motor, the mounting bracket that comes with it, stainless steel bolts and washers, a drill with proper drill bits, marine-grade sealant, and a wrench or socket set. If your boat has a thin aluminum deck or fiberglass bow, having a backing plate or large washers underneath will help distribute the weight and prevent damage over time.
It’s also a good idea to fully charge your battery and disconnect all power sources before working on any wiring. Safety first always applies when working on boats and electrical components.
Choosing the Right Mounting Position
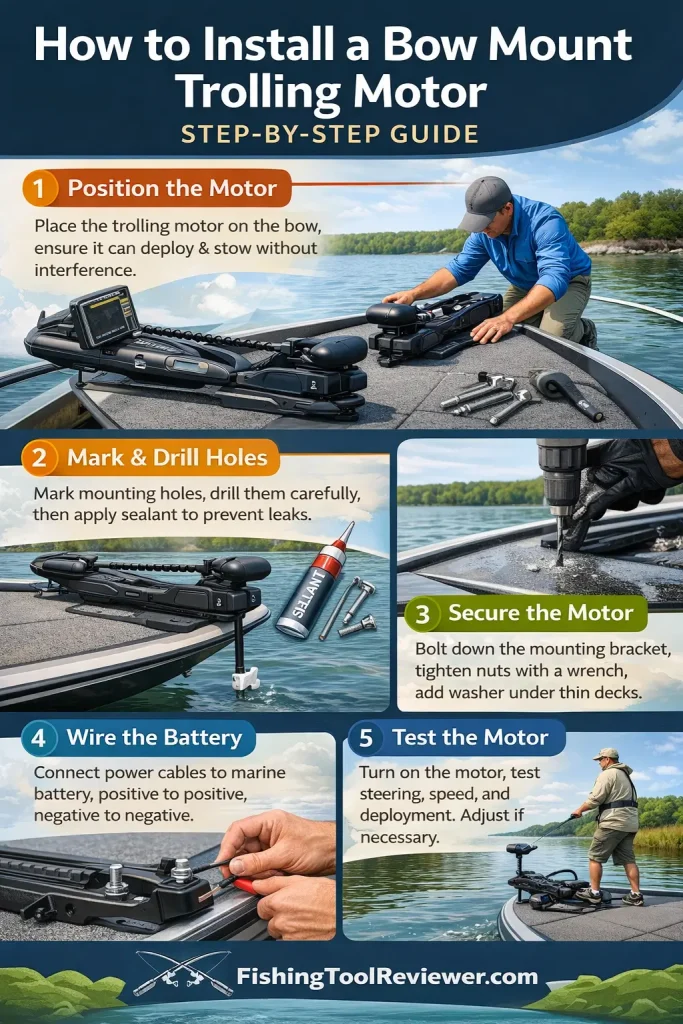
Positioning the trolling motor correctly on the bow is one of the most important steps. Place the motor on the front deck and make sure it can deploy and stow without hitting the rub rail, bow light, or anchor. When stowed, the motor shaft should sit straight and secure, not angled off to one side. Take your time here, because once holes are drilled, there’s no easy way to move them.
Most anglers prefer mounting the motor slightly off-center to avoid interfering with the bow cleat or navigation light. Always test the deploy and stow motion several times before marking any holes.
Drilling and Securing the Mount
Once you’re confident with the position, mark the mounting holes using the motor bracket as a guide. Drill the holes carefully, applying steady pressure and keeping the drill straight. After drilling, apply marine-grade sealant around each hole to prevent water from seeping into the deck.
Insert the bolts through the mounting bracket and deck, then secure them from underneath using washers and lock nuts. Tighten everything evenly, but avoid over-tightening, which can crack fiberglass or deform aluminum decks. A solid mount should feel completely stable with no wobble when pressure is applied.
Wiring the Trolling Motor to the Battery
After mounting the motor, the next step is wiring. Route the power cables neatly along the inside of the boat, keeping them away from sharp edges and moving parts. Use zip ties or cable clamps to keep everything secure. Connect the wires directly to the trolling motor battery or batteries, matching positive to positive and negative to negative.
If your motor uses a 24V or 36V system, follow the manufacturer’s wiring diagram carefully. Installing a circuit breaker between the battery and motor is highly recommended, as it protects your motor from electrical surges and potential damage.
Testing and Final Adjustments
Once everything is connected, reconnect the battery and power on the trolling motor. Test all speed settings, steering controls, and deploy and stow functions. Listen for any unusual noises and make sure the motor runs smoothly. If something feels off, now is the best time to fix it before hitting the water.
Take the boat out for a short test run in calm conditions. Pay attention to steering response and how the boat handles in light wind. A properly installed bow mount trolling motor should feel smooth, quiet, and responsive.
Common Installation Mistakes to Avoid
One of the most common mistakes anglers make is rushing the mounting position. Another is skipping the use of sealant, which can lead to water damage over time. Using undersized bolts or ignoring a circuit breaker can also create problems down the road. Taking a little extra time during installation can save you a lot of frustration later.
Final Thoughts
Installing a bow mount trolling motor is a rewarding upgrade that can completely change how you fish. It gives you better boat control, quieter movement, and more precision when working structure or shallow water. Whether you’re chasing bass along weed lines or holding position in wind, a properly installed bow mount trolling motor makes every trip more enjoyable and productive.
If you’re planning to upgrade or replace your motor in the future, understanding the installation process now will help you choose the right model with confidence.